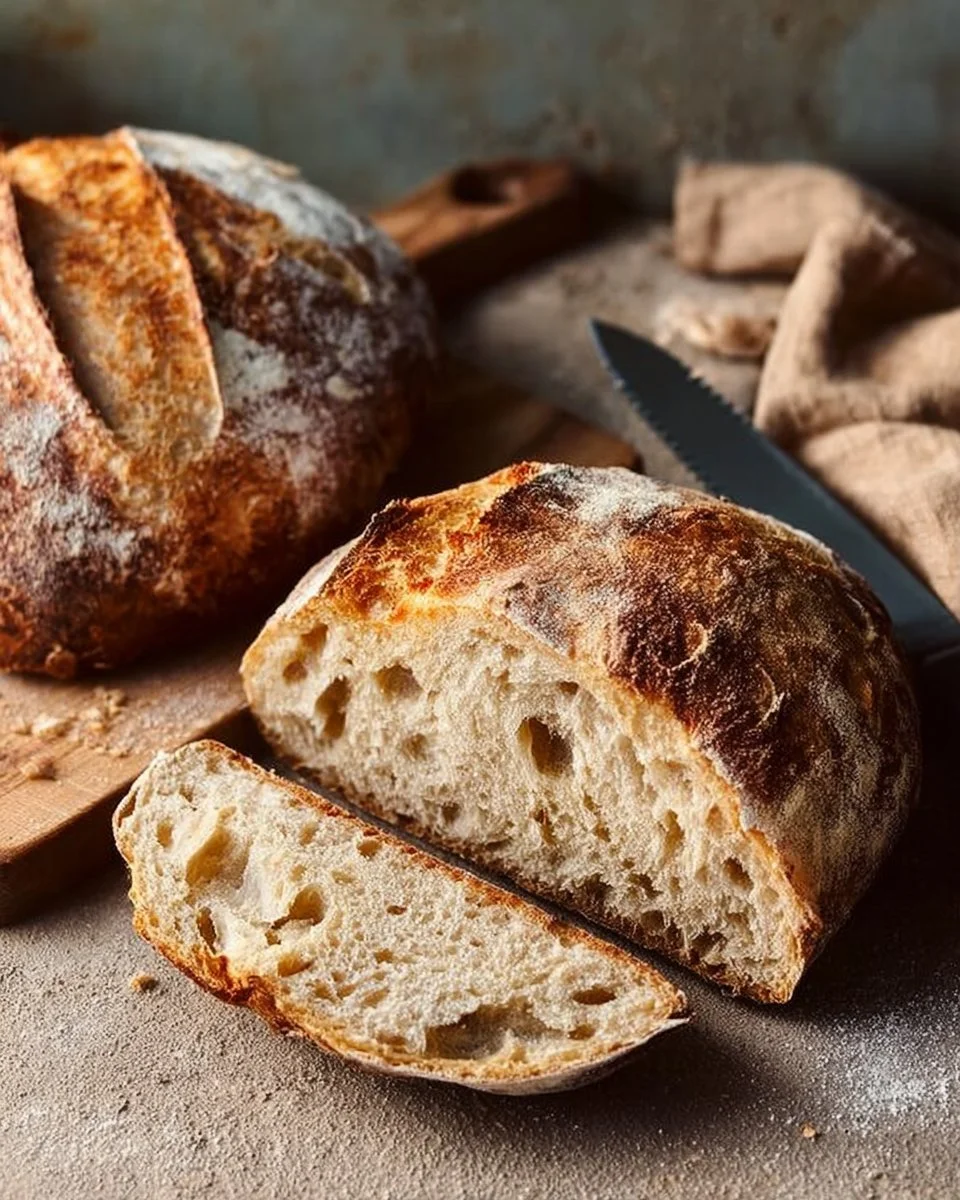
No-Knead Crusty Bread
No-Knead Crusty Bread is an easy, classic loaf you can make at home with little hands-on time. It gives a crisp crust and a soft, open crumb. This bread fits simple weekly meal plans and makes a great base for healthy meals.
INTRODUCTION
No-Knead Crusty Bread is a simple loaf that needs no heavy work. It takes time to rest, but you do not need to knead. This method gives a deep flavor and a crunchy crust with very little effort. Serve it warm for breakfast or use it for sandwiches and soups.
For a cozy morning, try a slice of this bread with a warm drink like a cozy gingerbread latte. The mild flavor of the bread pairs well with spiced coffee and light spreads.
WHY YOU WILL LOVE THIS RECIPE
- Very low effort: mix, rest, and bake. This is a great recipe for busy weeks.
- Lighter option: you can make a healthier version by using part whole wheat flour and seeds.
- Great for meal prep: bake one loaf and slice it for quick breakfasts or wraps.
- Good for weight loss plans when you watch portions and topping choices because a single slice can be filling when paired with protein or vegetables.
- Balanced meals: pair toast with eggs, lean meat, or beans for a high protein meal and stable energy.
This bread is easy to adapt. For a gluten-friendly household, choose certified gluten-free flours in special recipes. If you like a touch of sweetness, pair slices with a small amount of honey or fruit jam and a warm cup of homemade gingerbread coffee creamer for a nice treat.
HOW TO MAKE No-Knead Crusty Bread
This method uses time and heat to form the crust and structure of the bread. The dough rests in the fridge for a long slow rise. Then you bake it in a hot, covered pot for a crispy crust.
EQUIPMENT NEEDED
- Large mixing bowl
- Plastic wrap or lid
- Dutch oven or heavy oven-safe pot with lid
- Parchment paper (optional)
- Bench scraper or spoon
- Oven mitts
- Cooling rack
Ingredients You’ll Need :
4 cups all-purpose flour, 1/4 teaspoon instant yeast, 1 1/2 teaspoons salt, 1 3/4 cups water
STEP-BY-STEP INSTRUCTIONS :
- In a large bowl, mix flour, yeast, and salt.
- Add water and stir until a shaggy dough forms.
- Cover the bowl with plastic wrap and let it rest in the refrigerator for 12 to 18 hours.
- When ready to bake, preheat your oven to 450°F (230°C).
- Grab a handful of dough and shape it into a ball.
- Let it rise for about 90 minutes.
- Place the dough in a preheated Dutch oven and cover it.
- Bake for 30 minutes, then uncover and bake for an additional 10-15 minutes until golden brown.
- Let the bread cool before slicing.

HOW TO SERVE No-Knead Crusty Bread
Serve slices warm or at room temperature. Here are simple, healthy serving ideas:
- For breakfast: one slice topped with a thin spread of avocado and a poached egg for a high protein meal.
- For lunch: open-faced sandwich with grilled chicken, spinach, and tomato. Keep portions in check with one to two slices.
- For dinner: serve 1–2 slices with a bowl of vegetable soup or a salad for a balanced meal with fiber and veggies.
Portion control tips:
- Aim for 1 slice (about 1 to 1.5 oz) per person for sides.
- For sandwiches, use one slice of bread per half sandwich for lighter meals.
- Pair each serving with protein and vegetables to feel full longer and keep it good for weight loss plans.
You can also enjoy a slice with a cup of gingerbread coffee to make a cozy snack that feels indulgent but stays simple.
STORAGE & FREEZING : No-Knead Crusty Bread
- Short term: Store at room temperature in a bread box or paper bag for up to 2 days to keep the crust crisp.
- Longer term: Wrap the cooled loaf tightly in plastic wrap and then foil. Freeze for up to 3 months.
- Thaw: To refresh, thaw at room temperature and reheat in a 350°F oven for 10–12 minutes to revive the crust.
- Sliced freezing: Slice before freezing and pull out individual pieces for quick toast or sandwiches. This is great for meal prep and reduces waste.
SERVING SUGGESTIONS
- Balanced side: Pair with a large salad and a lean protein like turkey or beans for a heart-healthy plate.
- For a lighter option: Skip butter and use hummus, mashed avocado, or ricotta with herbs.
- For a low-sugar option: Top with fresh tomatoes, basil, and a drizzle of olive oil.
- For a cozy snack: Lightly toast and spread a thin layer of nut butter with banana slices for protein and fiber.
If you like chilled drinks, enjoy a slice along with gingerbread iced coffee for a contrast in temperature and texture.
VARIATIONS
- Healthier version: Replace 1 to 2 cups of all-purpose flour with whole wheat flour. Add 2 tablespoons of flax seeds or chia for extra fiber and omega-3s. This makes the loaf more filling and adds fiber for digestive health.
- High-protein or low-carb version: For a higher protein loaf, mix in 1/2 cup vital wheat gluten and 1/2 cup high-protein flour such as soy or chickpea flour and reduce the white flour accordingly. Another option is to make small high-protein toasts by slicing the loaf thin and topping with cottage cheese and herbs. For a low-carb version, this exact no-knead formula is not ideal, but you can use a low-carb quick-bread recipe with almond flour, psyllium husk, and eggs to create a similar crusty top in the oven or air fryer.
- Air fryer or oven-baked version: You can bake small individual loaves in an air fryer. Use a small oven-safe dish that fits your air fryer basket, preheat to 400°F, and reduce time—check after 20–25 minutes. For a standard oven, follow the Dutch oven method but bake on a preheated baking stone or sheet with a pan of hot water to add steam for a similar crust.
These swaps let you make a lighter option or a version that fits a high protein meal plan. If you try a high-protein mix, remember the texture will change but it still forms a tasty, filling loaf.
FAQs
Q: Is this bread healthy?
A: Yes, in a basic sense. Whole grain swaps and seeds add fiber and nutrients. Keep portion size and toppings balanced to make it part of a healthy diet.
Q: Can I make this bread diabetic-friendly?
A: You can make better choices by using whole wheat, adding seeds, and watching portions. Pair slices with protein and non-starchy vegetables to lower the meal glucose impact.
Q: How long does the bread last once cut?
A: Sliced bread will stay good for 1–2 days at room temperature in an airtight container. For longer storage, freeze slices.
Q: Can I use less yeast or different yeast?
A: Instant yeast at the given small amount works well for long, slow rise. Using active dry yeast will also work but may need a short proof step. The long rest time develops flavor without much yeast.
Q: Is this good for weight loss plans?
A: It can be. Use thinner slices and pair with protein and veggies for a filling, balanced meal that helps control calories.
Q: Can I make this in an air fryer?
A: Yes, see the air fryer variation above for small loaves. Bake times are shorter—watch closely for browning.
MAKE-AHEAD TIPS FOR No-Knead Crusty Bread
- Prep the dough the night before and let it rest in the fridge for up to 18 hours. This saves time on bake day and is great for meal prep.
- Freeze fully baked, sliced bread so you can pull individual slices for quick toast or sandwiches. This makes weekday mornings easier.
- For party prep: Shape several small dough balls and refrigerate. Bake them fresh before serving for warm mini loaves.
- Use leftovers in meal prep: cube stale or day-old bread for croutons, bread pudding, or to thicken soups. This reduces waste and saves time.
This bread is a versatile base for many meals. Try a healthier version with whole grains and seeds for extra fiber, or make a higher-protein topping for a balanced plate. With a little planning, this recipe is great for meal prep and for keeping meals simple and satisfying.

No-Knead Crusty Bread
Ingredients
Method
- In a large bowl, mix flour, yeast, and salt.
- Add water and stir until a shaggy dough forms.
- Cover the bowl with plastic wrap and let it rest in the refrigerator for 12 to 18 hours.
- When ready to bake, preheat your oven to 450°F (230°C).
- Grab a handful of dough and shape it into a ball.
- Let it rise for about 90 minutes.
- Place the dough in a preheated Dutch oven and cover it.
- Bake for 30 minutes, then uncover and bake for an additional 10-15 minutes until golden brown.
- Let the bread cool before slicing.