Warm Brie and Pear Tartlets
Warm Brie and Pear Tartlets
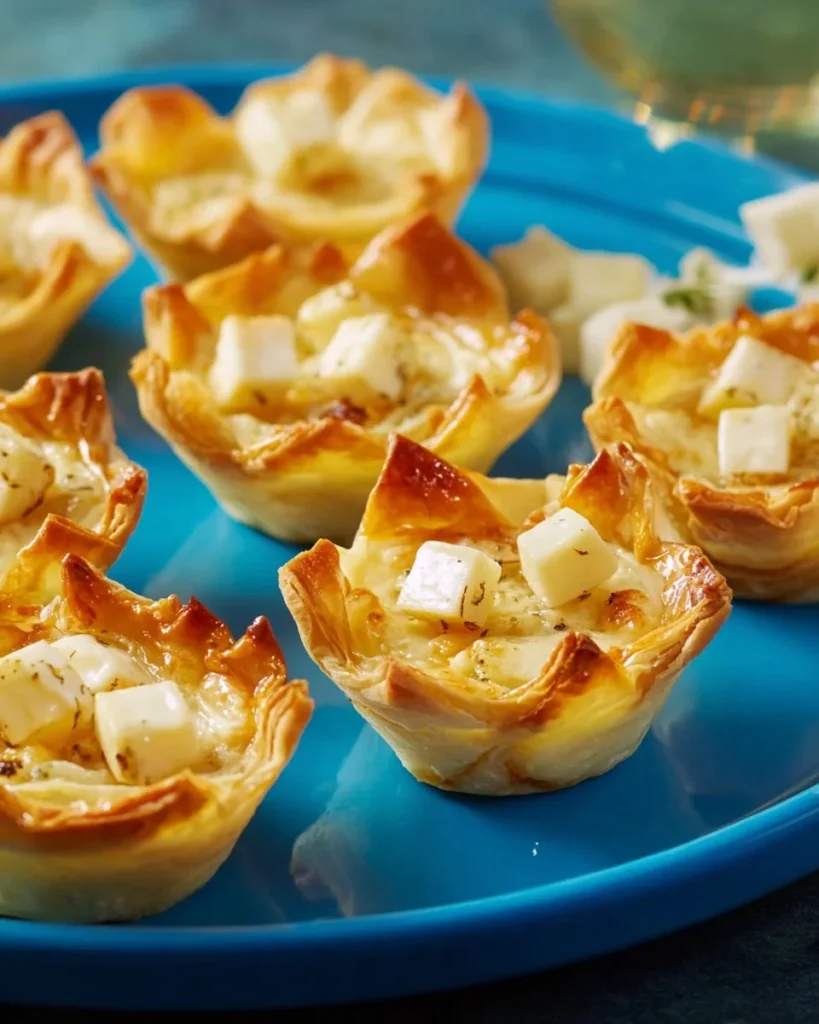
Warm Brie and Pear Tartlets are a delightful treat that combines creamy Brie cheese with sweet, ripe pears. This simple yet elegant recipe allows you to create mini tartlets that are perfect for parties or as a quick snack. Plus, these tartlets can be a healthier option when made with care, making them enjoyable for everyone, including those on a weight loss journey.
WHY YOU WILL LOVE THIS RECIPE
You will love these Warm Brie and Pear Tartlets because they are a quick meal prep option. With just a handful of ingredients, you can whip up these mini delights in no time. They are great for gatherings or simply enjoying at home. This healthy version of tartlets embraces the balance between sweetness and savory, making it a balanced snack or appetizer. This is a lighter option that brings pleasure while also keeping your health goals in mind.
HOW TO MAKE Warm Brie and Pear Tartlets
Creating these tartlets is a straightforward process. Let’s get started with the essentials for making kitchen magic happen.
EQUIPMENT NEEDED
- Oven
- Jelly roll pan
- Parchment paper
- Measuring spoons
- Knife and cutting board
- Baking spatula (optional)
Ingredients You’ll Need:
- 24 mini phyllo tart shells
- 1/4 pound ripe Brie cheese, cut into 24 small chunks
- 1 ripe pear, cut into small dice
- 2 sprigs fresh thyme
- 2 tablespoons honey, or to taste
STEP-BY-STEP INSTRUCTIONS:
- Preheat the oven to 400 degrees F (200 degrees C). This will ensure that your tartlets cook evenly and get that golden color.
- Line a jelly roll pan with parchment paper. This will prevent your tartlets from sticking to the pan.
- Arrange the tart shells onto the prepared pan. This step is straightforward and sets the stage for filling them.
- Place a piece of Brie cheese into each shell. The cheese will melt beautifully, creating a luscious filling.
- Sprinkle diced pear and a couple of thyme leaves into each shell. The pears add a natural sweetness, while thyme brings a savory depth.
- Drizzle with honey. This addition will enhance the flavor even more; adjust the amount based on your taste preference.
- Bake in the preheated oven until the cheese is melted and the tarts are golden, about 12 to 15 minutes.

HOW TO SERVE Warm Brie and Pear Tartlets
These Warm Brie and Pear Tartlets are best served fresh from the oven. To keep it healthy, serve them with a side of mixed greens tossed with a light vinaigrette. This adds fiber to your snack and keeps the portions controlled. Aim for 2-3 tartlets per person, depending on your meal plan or dietary needs. By combining these tartlets with greens, you can create a balanced meal that’s both satisfying and heart-healthy.
STORAGE & FREEZING: Warm Brie and Pear Tartlets
If you have leftover tartlets, store them in an airtight container in the refrigerator for up to 2 days. To reheat, place them in the oven at 350 degrees F for about 5-8 minutes or until warmed through. If you plan to make these ahead of time, you can assemble the tartlets and freeze them before baking. Just bake them directly from the freezer, adding a few extra minutes to the baking time.
SERVING SUGGESTIONS
Pair these elegant bites with a refreshing salad made from baby spinach, walnuts, and a light vinaigrette. This adds a boost of omega-3 fatty acids and fiber, making your meal more balanced. You can also consider serving them alongside a low-sodium soup for a complete meal.
VARIATIONS
-
Healthier Version: Swap the honey for a sugar-free sweetener for a low-calorie option. You can also use whole wheat or gluten-free tart shells to enhance the nutritional profile.
-
High-Protein or Low-Carb Version: Consider using a high-protein cheese like cottage cheese instead of Brie. You may opt for a low-carb shell, or make a crust using almond flour for a delightful crunch while keeping carbs low.
-
Air Fryer Version: To make these tartlets in an air fryer, set the air fryer to 350 degrees F and cook for about 8-10 minutes. This method helps retain the same great flavor, while being a low-oil preparation.
FAQs
1. Are these tartlets gluten-free?
You can make them gluten-free by choosing gluten-free mini phyllo shells or making your own crust with gluten-free flour.
2. Can I make these tartlets ahead of time?
Absolutely! You can prepare the filling and assemble the tartlets to freeze. Just pop them in the oven when you’re ready to bake.
3. Are Warm Brie and Pear Tartlets suitable for Weight Loss?
Yes! This dish can be a lighter option if you control portions and use lower-calorie ingredients like reduced-fat cheese or less honey.
4. How should I store leftover tartlets?
Store them in an airtight container in the refrigerator for up to 2 days. To reheat, place them back in the oven until heated thoroughly.

MAKE-AHEAD TIPS FOR Warm Brie and Pear Tartlets
These Warm Brie and Pear Tartlets are the perfect dish for meal prep. You can make the filling in advance and store it in the refrigerator. Pre-fill the tart shells and freeze them until you’re ready to bake. This way, you always have a delicious, healthy snack on hand. Ideal for busy weekdays, these tartlets allow you to enjoy a gourmet experience without taking too much time. With this preparation strategy, you can save time for other important things while still enjoying a delightful treat.
In conclusion, Warm Brie and Pear Tartlets are a delicious, healthy choice that blends flavor and nutrition seamlessly. They offer a quick meal prep solution that fits well into a balanced diet. Whether you’re looking for a snack, appetizer, or something to impress your guests, these tartlets are sure to be a hit!
Warm Brie and Pear Tartlets
Ingredients
Method
- Preheat the oven to 400 degrees F (200 degrees C).
- Line a jelly roll pan with parchment paper.
- Arrange the tart shells onto the prepared pan.
- Place a piece of Brie cheese into each shell.
- Sprinkle diced pear and a couple of thyme leaves into each shell.
- Drizzle with honey.
- Bake in the preheated oven until the cheese is melted and the tarts are golden, about 12 to 15 minutes.