INTRODUCTION
Garlic and Dill Lacto Fermented Pickles are a simple, tasty way to enjoy crunchy cucumbers with bright garlic and dill flavors. These pickles are a healthy version of classic pickles because they use natural fermentation, not vinegar. Fermented foods help gut health and add natural probiotics to your diet. This recipe is a lighter option for snacks and a great choice for meal prep. If you like making your own drinks or healthy sides, try it alongside a cold drink like an apple and ginger cooler for a balanced, refreshing plate.
Fermented pickles are low calorie and gluten free. They fit many diets, including low carb plans and diabetic-friendly meal choices, when you watch portion size. These pickles add flavor to sandwiches and salads without many calories. They can help with weight loss when used as a crunchy, low-calorie snack instead of chips.
WHY YOU WILL LOVE THIS RECIPE
- Easy to make at home with low cost ingredients.
- A lighter option to buy-from-store pickles that often contain vinegar and added sugars.
- Great for meal prep: make a big batch and use it through the week for snacks, salads, or sides.
- Healthy benefits: fermented foods support gut health and digestion with natural probiotics.
- Low calorie, gluten free, and low carb — good for weight loss plans and diabetic-friendly eating.
- Good for the heart: this recipe avoids added sugars and processed preservatives, making it a heart healthy choice when eaten with a balanced diet.
This recipe gives you a crunchy, sour, and garlicky snack that pairs well with protein-rich meals to make a balanced plate. If you want a cold drink with a fresh bite, serve your pickles with a cooling hibiscus tea with ginger and turmeric to create a flavorful, health-focused pairing.
HOW TO MAKE Garlic and Dill Lacto Fermented Pickles
This simple method uses a basic brine and natural fermentation. The process allows good bacteria to grow and preserve the cucumbers while keeping them crisp. You get a probiotic-rich, low calorie snack that is also gluten free and low carb.
EQUIPMENT NEEDED
- 1 large gallon sized, wide-mouth glass jar (sterilized)
- Small plate that fits inside the jar to weight down contents
- Rubber band or twine to hold cloth or towel in place
- Large bowl to catch overflow during fermentation
- Small bowl for spice mixing
- Clean spoon or tamper for packing cucumbers
Ingredients You’ll Need :
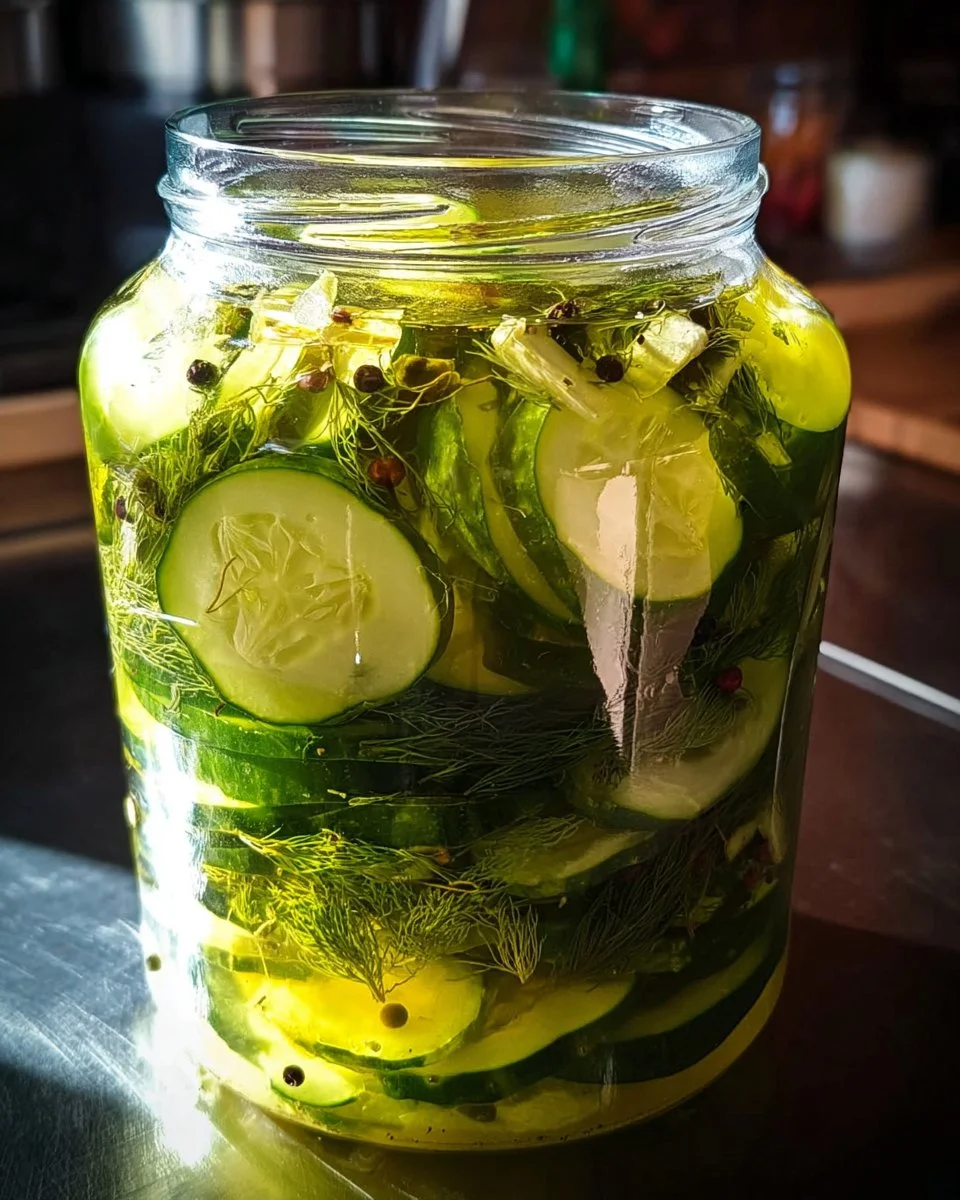
1 gallon spring water, 3/4 cup sea salt, 5 pounds fresh pickling cucumbers, 3 (2 inch) pieces peeled horseradish root, 6 medium heads fresh dill, 2 large onions, cut into rings, 1 head garlic, cloves separated and peeled, 5 tablespoons whole black peppercorns, 3 tablespoons whole mustard seeds, 2 tablespoons red pepper flakes, 6 large bay leaves, 3 cups washed mustard greens, or as needed
STEP-BY-STEP INSTRUCTIONS :
Pour a small amount of spring water out of the bottle. Add sea salt, put the cap back on, and shake until dissolved; set brine aside. Inspect a gallon sized jar for cracks. Sterilize in simmering water. Cut off the blossom ends (opposite the stem ends) of cucumbers. Cut into thick rounds or spears, or leave whole. Slice each piece of horseradish root into 4 pieces. Mix peppercorns, mustard seeds, and pepper flakes together in a small bowl. Lay 2 heads of dill in the bottom of the sterilized jar; top with 1/3 of the onion rings, 1/3 of the garlic cloves, and 1/3 of the cucumbers, then pack down tightly. Sprinkle in 1/3 of the peppercorn mixture and 1/3 of the horseradish pieces. Repeat these layers twice more; jar will be fully packed except for top 1 to 2 inches. Fold up mustard greens and pack them tightly at the top. Pour in brine until completely full and covering mustard greens. Make sure there are no bubbles stuck inside the jar. Reserve excess brine. Place a small plate at the top of the jar to keep the contents weighed down. Cover with a towel and wrap jar top with a rubber band or twine to keep in place. Store in a cool location (60 to 80 degrees F, 16 to 27 degrees C) for 1 week; check brine level daily, adding more as needed to keep everything submerged. After 1 week, sample pickles for flavor. Cover and continue to ferment to desired flavor, up to 3 more weeks. Once pickles are done to your liking, divide into smaller, sterilized Mason jars and seal tightly. Store in the refrigerator. If taste is too strong, pour out part of the brine and add spring water. The fermentation process causes bubbles to form so some of the brine will leak over the top of the jar. Put your jar in a large bowl to catch the mess! Brine may turn cloudy with time, this is normal. Do not use a water or pressure canner! It will cook the cukes and kill the fermentation. Don’t use store bought cucumbers as they have a wax coating that will interfere with the fermentation. If cucumbers aren’t just picked, soak them for a few hours in ice cold water to freshen them. Don’t use tap water, as it contains chlorine and other chemicals that prevent fermentation. Make sure to cut off blossom ends, this will keep pickles crispy.

HOW TO SERVE Garlic and Dill Lacto Fermented Pickles
Serve pickles cold from the fridge. A few slices with a plate of lean protein makes a high protein meal when paired with grilled chicken, salmon, or a bean salad. For portion control, plan one to three spears or 4–6 rounds per snack depending on your daily calorie plan. These pickles are low calorie and full of flavor, so they help you feel full with less food. For a balanced meal, add a small serving of whole grains and a lean protein to make a meal that fits weight loss goals.
You can also dice pickles into tuna or egg salad to boost flavor and add some fiber. They are a great for meal prep item: pack jars in the fridge and add a few slices to lunches all week. If you want a cold, bright drink on the side, pair a small plate of pickles with a chilled apple and ginger cooler to refresh the palate.
STORAGE & FREEZING : Garlic and Dill Lacto Fermented Pickles
Store sealed jars in the refrigerator. Properly fermented and sealed pickles can last several months in the fridge. Always use clean utensils when removing pickles to avoid contamination. Do not freeze fermented pickles; freezing will damage the texture and kill the live cultures. If the brine level drops, add a bit of fresh spring water to keep the cucumbers submerged. Check jars for off smells or mold; normal fermentation gives a tangy smell and sometimes cloudy brine, which is fine.
SERVING SUGGESTIONS
- Serve with grilled lean chicken or turkey for a high protein meal.
- Add to salads, grain bowls, or avocado toast for a tangy crunch.
- Use as a low carb side for burgers or sausages. This makes a lighter option instead of fries.
- Pair with a warm cup of tea or a cooling hibiscus drink for a balanced snack.
For a simple balanced plate: one serving of pickles, 4–6 ounces of grilled fish or chicken, and a cup of mixed greens with a light dressing. This combo is low calorie and heart healthy when you choose lean protein and whole produce.
VARIATIONS
- Healthier version: Reduce the amount of onions and pepper flakes if you want lower sodium taste. Use extra fresh dill and garlic for flavor. You can also use low-sodium sea salt version and top up with spring water to control salt levels.
- High-protein or low-carb version: Serve pickles with a plate of hard-boiled eggs, smoked salmon, or grilled chicken breast to create a high protein meal that stays low carb. Chop pickles into a salad of spinach, cottage cheese, and turkey for a filling, diabetic-friendly lunch.
- Air fryer or oven-baked version: While you cannot ferment in the air fryer, you can make quick baked garlic-dill chips for a similar flavor. Slice cucumbers and toss them in a light spray of oil with garlic powder and dill. Air fry at low heat for a few minutes to make a crispy, low-calorie snack. This is a quick alternative when you want a crunchy, baked version rather than fermented. Note: this baked version will not have probiotics, but it can be a tasty, low-calorie, gluten free snack.

FAQs
Q: Are lacto fermented pickles healthy?
A: Yes. They are a healthy food choice because fermentation adds probiotics which support gut health. They are low calorie and gluten free. For salt-sensitive diets, make a lower-sodium brine.
Q: Can diabetics eat these pickles?
A: Yes. These pickles are low in sugar and low carb, so they fit many diabetic-friendly meal plans. Watch salt intake and portion sizes. If you are on a strict diet or insulin plan, check with your doctor.
Q: How long do fermented pickles last in the fridge?
A: When stored in sterilized jars in the refrigerator, they can last for several months. Always use clean utensils and check for off smells or mold.
Q: Will fermentation change the cucumber texture?
A: Proper fermentation keeps cucumbers crisp if you cut off blossom ends and use fresh cucumbers. If cucumbers soften, they may have been over-fermented or not fresh to start.
Q: Can I freeze fermented pickles?
A: No. Freezing breaks down the texture and kills live cultures. Store in the fridge instead.
Q: Is this recipe low calorie and good for weight loss?
A: Yes. The pickles themselves are low calorie and make a good, crunchy snack for people aiming for weight loss. Use them to replace higher calorie snacks to lower daily intake.
MAKE-AHEAD TIPS FOR Garlic and Dill Lacto Fermented Pickles
- Make a full gallon jar at once. Fermented pickles are great for meal prep and lasting use.
- Prepare cucumbers and spices the night before to save time. Pack jars and pour brine the next morning.
- Keep sterilized small Mason jars ready. Once your main jar reaches the flavor you like, divide into smaller jars for easy grab-and-go snacks. This saves time and helps portion control.
- Label jars with the date so you know when they were packed. Use within several months in the fridge for best taste.

Garlic and Dill Lacto Fermented Pickles
Ingredients
Method
- Pour a small amount of spring water out of the bottle. Add sea salt, put the cap back on, and shake until dissolved; set brine aside.
- Inspect a gallon sized jar for cracks and sterilize it in simmering water.
- Cut off the blossom ends of cucumbers and cut them into thick rounds or spears, or leave them whole.
- Slice each piece of horseradish root into 4 pieces.
- Mix peppercorns, mustard seeds, and pepper flakes together in a small bowl.
- Layer 2 heads of dill in the bottom of the sterilized jar; top with 1/3 of the onion rings, 1/3 of the garlic cloves, and 1/3 of the cucumbers, then pack down tightly. Sprinkle in 1/3 of the peppercorn mixture and 1/3 of the horseradish pieces. Repeat these layers twice more; jar will be fully packed except for the top 1 to 2 inches.
- Fold up mustard greens and pack them tightly at the top.
- Pour in brine until completely full and covering mustard greens. Ensure there are no bubbles stuck inside the jar.
- Place a small plate at the top of the jar to keep the contents weighed down. Cover with a towel and wrap jar top with a rubber band or twine to keep in place.
- Store in a cool location (60 to 80 degrees F, 16 to 27 degrees C) for 1 week; check brine level daily, adding more as needed to keep everything submerged.
- After 1 week, sample pickles for flavor. Cover and continue to ferment to desired flavor, up to 3 more weeks.
- Once pickles are done to your liking, divide into smaller, sterilized Mason jars and seal tightly. Store in the refrigerator.