
INTRODUCTION
Favorite Bread and Butter Pickles are a classic sweet and tangy snack. They add crunch and bright flavor to sandwiches, salads, and bowls. These pickles are easy to make at home. You can control sugar and salt to make a healthy version. If you like warm, cozy drinks with your snacks, try it with a warm treat like cozy gingerbread latte to contrast the sweet and tart flavor in a fun way.
This article shows simple steps, smart swaps, and good serving ideas. It also looks at ways to make a lighter option, a diabetic-friendly swap, and how to store jars for later. You will find tips for meal prep and ways to pair pickles for a high protein meal.
WHY YOU WILL LOVE THIS RECIPE
You will love this recipe because it is easy, cheap, and full of bright flavor. It is a great recipe for making many jars at once. This makes it a great for meal prep item to keep on hand. If you choose a low-sugar version, it becomes a lighter option and a good choice for people watching calories. Pickles are naturally low calorie and low carb when made with less sugar. They are also gluten free, so they fit many diets. When you pair them with lean meat or beans, they help round out a high protein meal.
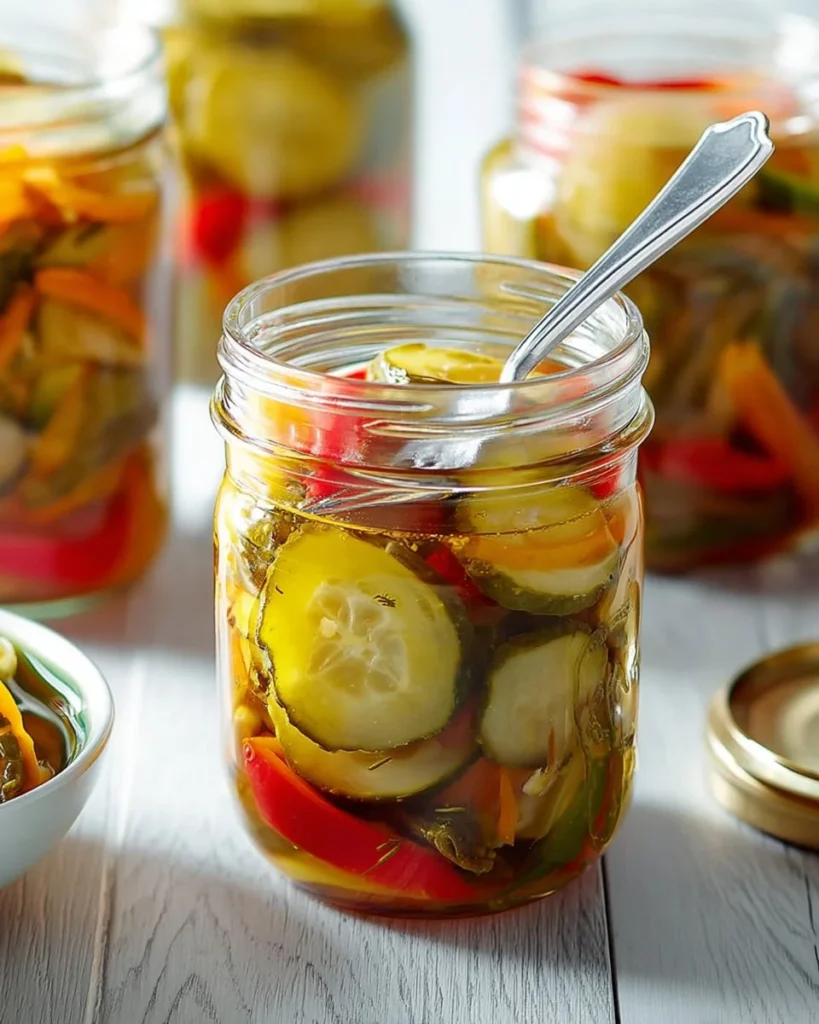
HOW TO MAKE Favorite Bread and Butter Pickles
This section explains how to make classic bread and butter pickles step by step. Follow the directions below and use safe canning practices. You can make the original recipe as written or try a healthy version with less sugar or a sugar substitute for a diabetic-friendly jar.
EQUIPMENT NEEDED
- Large bowl for soaking vegetables
- Another large bowl for rinse water
- Dutch oven or large pot for the brine
- Canning jars (11 hot 1-pint jars) with lids and bands
- Water bath canner or large pot for processing jars
- Jar lifter and funnel (helpful)
- Ladle and bubble remover tool or a non-metal spatula
- Clean towel and workspace
Ingredients You’ll Need :
20 cups sliced cucumbers (about 12 medium), 3 cups sliced onions (about 4 medium), 1 medium sweet red pepper, sliced, 1 medium green pepper, sliced, 3 quarts ice water, 1/2 cup canning salt, 6 cups sugar, 6 cups white vinegar, 3 tablespoons mustard seed, 3 teaspoons celery seed, 1 and 1/2 teaspoons ground turmeric, 1/4 teaspoon plus 1/8 teaspoon ground cloves
STEP-BY-STEP INSTRUCTIONS :
Place cucumbers, onions and peppers in a large bowl. In another large bowl, mix ice water and salt; pour over vegetables. Let stand 3 hours. Rinse vegetables and drain well. Pack vegetables into 11 hot 1-pint jars to within 1/2 inch of the top. In a Dutch oven, bring sugar, vinegar, mustard seed, celery seed, turmeric and cloves to a boil. Carefully ladle hot liquid over vegetable mixture, leaving 1/2 inch headspace. Remove air bubbles and adjust headspace, if necessary, by adding hot liquid. Wipe rims. Center lids on jars; screw on bands until fingertip tight. Place jars into canner, ensuring that they are completely covered with water. Bring to a boil; process for 10 minutes. Remove jars and cool.

HOW TO SERVE Favorite Bread and Butter Pickles
Serve these pickles cold or at room temperature. They taste great with sandwiches, burgers, and cold salads. For a healthy serving plan, use 1 to 2 tablespoons per sandwich or meal. That gives you big flavor with very few calories. Pickles add fiber from the vegetables and a tang that helps you enjoy smaller portions of heavier foods. For a balanced, high protein meal, place a few slices on top of a grilled chicken breast or a bowl of black beans and rice. If you want a cool fruity drink to pair with your pickles, try a crisp glass of apple and ginger cooler for a bright, fresh match.
Portion control tip: One pint usually serves 6–8 people if you use a few slices each time. For meal prep, pack a small container of pickles with your lunch rather than serving the whole jar at once.
STORAGE & FREEZING : Favorite Bread and Butter Pickles
Store sealed jars in a cool, dark place for up to one year. Once opened, keep jars in the refrigerator and use within 1–2 months for best taste. These pickles should not be frozen in jars. If you need to freeze, remove the liquid and freeze the cucumber slices in a sealed freezer bag, but note the texture will soften. For safe canning, always follow proper water bath canning steps and check seals before storage.
SERVING SUGGESTIONS
- Pair with lean turkey or grilled chicken for a high protein meal.
- Add to a salad with mixed greens, beans, and a small amount of cheese for a balanced plate.
- Use as a low calorie snack with raw vegetables and a small protein dip like Greek yogurt ranch.
- Top a tuna or egg salad sandwich to add crunch and zest without lots of calories.
A simple side that stays light: a bowl of steamed green beans or a quinoa salad for fiber and protein.
VARIATIONS
- Healthier version: Use 2 cups sugar and 4 cups of a zero-calorie sweetener made for canning, or reduce sugar by half and add 1/4 cup apple juice for balance. This makes a lower calorie, lower sugar jar that is more diabetic-friendly and a better fit for weight loss plans. Taste and adjust spices as needed.
- High-protein or low-carb version: Keep the cucumber and pepper mix the same, but trim sugar to a minimum and use a natural sweetener safe for canning or a vinegar-forward brine. Serve with high protein sides like grilled salmon or a boiled egg salad to create a high protein meal. Pickles themselves are low calorie and low carb when sugar is reduced.
- Air fryer or oven-baked version: While these pickles are made to can, you can turn slices into crispy snacks. Drain pickles well, toss lightly in a thin batter or panko mix, then air fry at 400°F for 6–8 minutes until crisp. For oven-baked chips, layer thin slices on a tray, spray with oil, and bake at 425°F for 10–12 minutes, flipping once. Both make a crunchy snack that pairs well with yogurt dips. For a cool drink with fried snacks, a chilled apple and ginger cooler works well.

FAQs
Q: Are these pickles healthy?
A: The vegetables are low calorie and full of water and fiber. The original recipe uses a lot of sugar, so try a low-sugar version to make them healthier. Reducing sugar makes them more diabetic-friendly and better for weight loss.
Q: Can I make this recipe diabetic-friendly?
A: Yes. Use less sugar or a safe canning sweetener. You can also use apple juice concentrate in small amounts to keep flavor while lowering added sugar. Always check with health guidance for your specific diet.
Q: How long do canned pickles last?
A: When sealed and stored in a cool, dark place, jars last up to one year. After opening, keep in the fridge and use within 1–2 months for best flavor.
Q: Can I freeze pickles?
A: Freezing changes their texture. It is better to store pickles in jars. If you must freeze, remove excess liquid and freeze slices in a freezer-safe bag, but expect them to be softer when thawed.
Q: Are these pickles low calorie?
A: The cucumbers and peppers are low calorie. The sugar in the brine raises calories. Use less sugar for a low calorie snack.
Q: Do pickles fit a low carb diet?
A: With reduced sugar, these pickles can be low carb. The healthier version or a sugar-free brine makes them a better fit for low carb plans.
MAKE-AHEAD TIPS FOR Favorite Bread and Butter Pickles
- Make jars ahead of time and store in a cool spot. Canned pickles are perfect for meal prep.
- Label jars with the date. They will taste best after at least one week of maturing.
- For quick weeknight use, make a small batch with less sugar and keep it in the fridge for up to 2 months. This is a great for meal prep item that adds flavor to many meals.
- Pack a small container of pickles with your lunch for a low calorie kick that helps you eat less of heavier sides.
Favorite Bread and Butter Pickles
Ingredients
Method
- Place cucumbers, onions, and peppers in a large bowl.
- In another large bowl, mix ice water and salt; pour over vegetables. Let stand for 3 hours.
- Rinse vegetables and drain well.
- Pack vegetables into 11 hot 1-pint jars to within 1/2 inch of the top.
- In a Dutch oven, bring sugar, vinegar, mustard seed, celery seed, turmeric, and cloves to a boil.
- Carefully ladle hot liquid over vegetable mixture, leaving 1/2 inch headspace.
- Remove air bubbles and adjust headspace if necessary by adding hot liquid.
- Wipe rims, center lids on jars, and screw on bands until fingertip tight.
- Place jars into canner, ensuring they are completely covered with water. Bring to a boil and process for 10 minutes.
- Remove jars and cool.