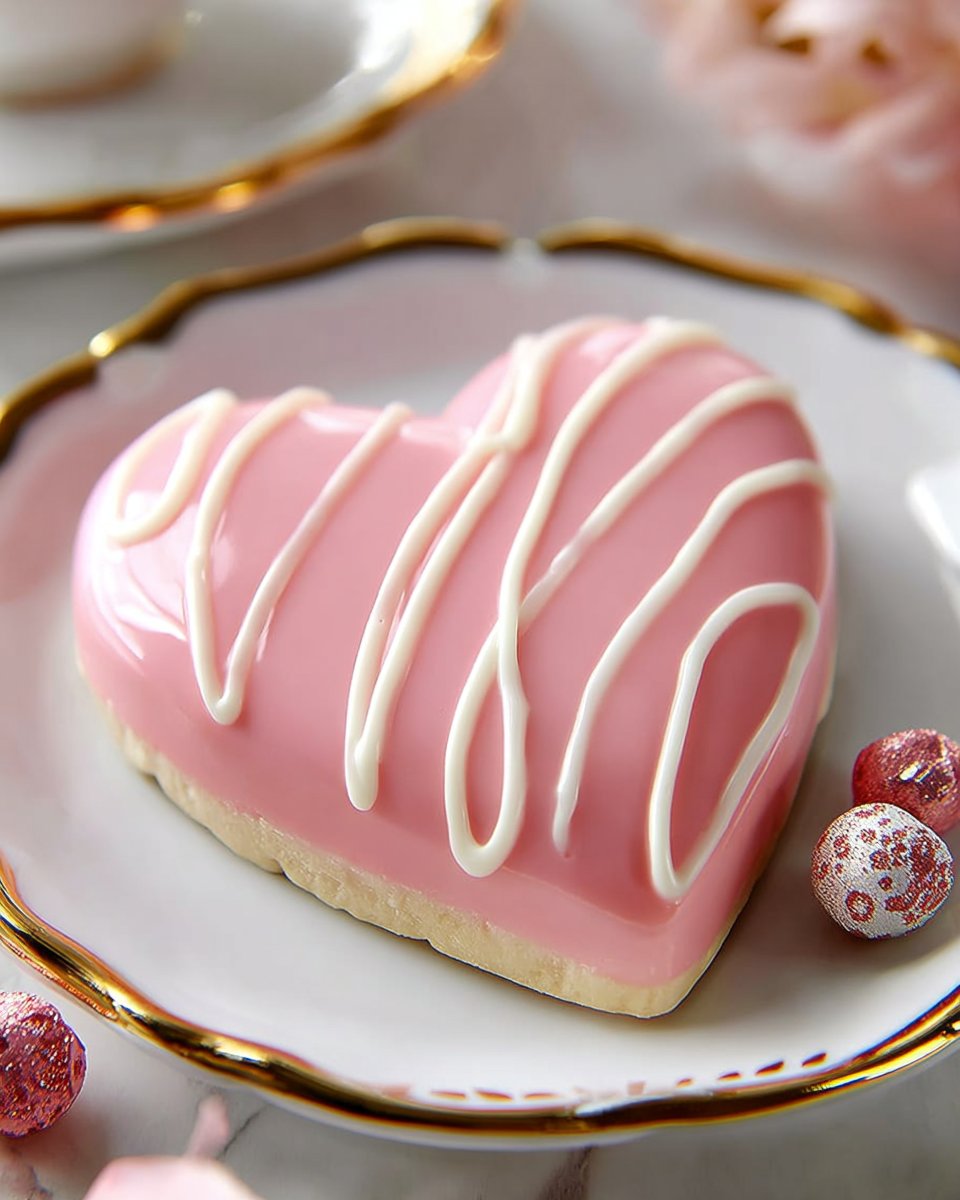
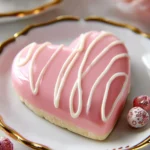
Copycat Little Debbie Valentine’s Day Cakes
INTRODUCTION
Every Valentine’s Day, we often think about sweet treats that express our affection. One beloved treat that brings back childhood memories is the Little Debbie Valentine’s Day Cakes. These delightful little cakes are soft, sweet, and covered in a beautiful pink coating. They are perfect for sharing with loved ones or enjoying all to yourself! Making a copycat version of these cakes at home is simple and satisfying. You can create these charming heart-shaped cakes using your kitchen. Let’s dive into this fun recipe!
WHY YOU WILL LOVE THIS RECIPE
You will love this recipe for many reasons. First, it allows you to recreate the magic of store-bought cakes in your kitchen. There is something special about homemade treats that makes them taste better. Plus, you can adjust the sweetness or color to fit your personal taste.
This recipe is also great because it’s fun! You get to make cake, pipe filling, and dip everything in candy melts. If you enjoy baking, making these cakes will feel like a little adventure. Lastly, they are perfect for sharing on Valentine’s Day. Whether you are giving them to friends, family, or your special someone, everyone will love these sweet treats!
HOW TO MAKE Copycat Little Debbie Valentine’s Day Cakes
Making these cakes is a step-by-step process. Don’t worry; even if you are not an expert in baking, you will find this recipe easy to follow. Here’s how to create your own copycat version of Little Debbie Valentine’s Day Cakes.
EQUIPMENT NEEDED
To get started, you will need some basic kitchen tools:
- Half sheet pan
- Parchment paper
- Mixing bowls
- Whisk
- Electric mixer
- 4-inch heart-shaped cookie cutter
- Piping bag
- Microwave-safe bowl
- Refrigerator
- Baking spatula
Ingredients You’ll Need :
- 1 1/4 cups all-purpose flour
- 1 teaspoon baking powder
- 1/4 teaspoon salt
- 1/2 cup unsalted butter, room temperature
- 1 cup sugar
- 2 eggs, room temperature
- 2 1/2 teaspoons vanilla
- 1/2 cup buttermilk, room temperature
- 1 cup unsalted butter, room temperature (for filling)
- 1 cup marshmallow fluff
- 3 cups confectioner’s sugar
- 2 teaspoons vanilla extract (for filling)
- 2 1/2 cups light pink candy melts
- 3 tablespoons coconut oil
- 2 tablespoons white chocolate, melted
STEP-BY-STEP INSTRUCTIONS :
-
Preheat your oven to 350°F (175°C). Prepare the half sheet pan by greasing it and lining it with parchment paper. Don’t forget to grease the parchment paper too.
-
In a mixing bowl, whisk together the flour, baking powder, and salt until combined. This ensures even distribution of the leavening and salt.
-
In a separate bowl, use an electric mixer to beat the unsalted butter and sugar together until they are fluffy. This should take about 3-4 minutes.
-
Add the eggs one at a time, mixing well after each addition. Then, stir in the vanilla until combined.
-
Alternate adding the dry ingredients and buttermilk into the butter mixture. Start with the flour mixture, then add some buttermilk, and repeat until you finish both.
-
Spread the batter evenly into the prepared pan. Make sure it is level to ensure even baking.
-
Bake in the preheated oven for 15 to 20 minutes until the edges are lightly golden brown.
-
Once baked, cool the cake in the pan for about 10 minutes. After that, transfer it to the fridge to chill for about 20 minutes.
-
In the meantime, make the filling. Beat the unsalted butter and marshmallow fluff together until smooth in a mixing bowl.
-
Next, add the confectioner’s sugar and the vanilla extract to the butter mixture and mix until combined and fluffy.
-
Once the cake has cooled, cut out hearts using a 4-inch heart-shaped cookie cutter. You will need two hearts for each cake.
-
Pipe the filling onto half of the heart-shaped cakes. Place the remaining hearts on top to create a sandwich.
-
Freeze the assembled cakes for 1 hour to set the filling.
-
After freezing, melt the candy melts in a microwave-safe bowl with the coconut oil. Stir until smooth.
-
Dip each frozen cake into the melted candy mixture, covering it completely.
-
Place the dipped cakes on a baking sheet lined with parchment paper.
-
Let the cakes set in the refrigerator for 15 minutes.
-
Finally, pipe melted white chocolate into swirls on top of each cake for a beautiful finish. Chill them again to let the swirls set.

HOW TO SERVE Copycat Little Debbie Valentine’s Day Cakes
These lovely cakes are the perfect dessert for any Valentine’s Day celebration! Serve them on a pretty plate, and they will catch everyone’s eye. You can pair them with fresh strawberries or some whipped cream for added fun. They are tasty with a cup of coffee or tea, too.
Don’t forget to take some pictures! The heart shapes and pink coating make for a beautiful display. Place a few on a cake stand or a decorative platter for an inviting look.
STORAGE & FREEZING : Copycat Little Debbie Valentine’s Day Cakes
To keep the cakes fresh, store them in an airtight container at room temperature. They are best enjoyed within three days. If you need to store them for a longer time, you can freeze them. Place the cakes in a freezer-safe container or wrap them tightly in plastic wrap. They can be frozen for up to three months.
When you are ready to enjoy them, simply take them out and let them thaw at room temperature for a few hours.
SERVING SUGGESTIONS
You can serve these cakes in many fun ways. Dark chocolate or raspberry sauce drizzled on top will add a special touch. For a richer dessert, consider adding a scoop of vanilla ice cream next to them. These cakes also look great with colorful sprinkles on top. Kids will love them!
Adding some fresh fruit, like strawberries or raspberries, creates a nice contrast and adds color to your plate. You can even serve them during a romantic dinner at home with candles for a beautiful touch!
VARIATIONS
There are many ways to make this recipe your own. Instead of pink candy melts, try using red or even white. For a fun twist, you can also make the filling flavored. Consider adding a little raspberry or strawberry puree to the marshmallow fluff for a fruity filling.
If you want to go beyond hearts, use different cookie cutters to shape the cakes for various occasions, like stars for a birthday or flowers for springtime.
You can also play around with the cake batter! Add cocoa powder to create a chocolate cake or even some sprinkles for a festive touch.
FAQs
Q1: Can I use regular milk instead of buttermilk?
A1: Yes, you can use regular milk. Simply add a tablespoon of vinegar or lemon juice to a half-cup of milk to make a buttermilk substitute.
Q2: How do I know when the cakes are done?
A2: The cakes are done when the edges are lightly golden brown, and a toothpick inserted into the center comes out clean.
Q3: Can I freeze the cakes after they are coated with candy melts?
A3: Yes, you can freeze the cakes after they are dipped. Just make sure to place them in a single layer so they do not stick together.
Q4: How should I store leftover cakes?
A4: Store leftover cakes in an airtight container at room temperature for up to three days. For longer storage, freeze them.
MAKE-AHEAD TIPS FOR Copycat Little Debbie Valentine’s Day Cakes
You can prepare the cakes a day before you need them. Make the cake and filling, assemble the heart-shaped cakes, and freeze them. On the day you plan to serve them, melt the candy and dip the cakes. They will be fresh and tasty when it’s time to enjoy them! This makes it easier to prepare for a gathering or special occasion.
Enjoy baking your Copycat Little Debbie Valentine’s Day Cakes, and make this Valentine’s Day extra sweet and memorable!
Copycat Little Debbie Valentine's Day Cakes
Ingredients
Method
- Preheat your oven to 350°F (175°C). Prepare the half sheet pan by greasing it and lining it with parchment paper. Don’t forget to grease the parchment paper too.
- In a mixing bowl, whisk together the flour, baking powder, and salt until combined.
- In a separate bowl, use an electric mixer to beat the unsalted butter and sugar together until fluffy, about 3-4 minutes.
- Add the eggs one at a time, mixing well after each addition. Stir in the vanilla until combined.
- Alternate adding the dry ingredients and buttermilk into the butter mixture until fully incorporated.
- Spread the batter evenly into the prepared pan and bake for 15 to 20 minutes until the edges are lightly golden brown.
- Cool the cake in the pan for about 10 minutes, then transfer it to the fridge to chill for about 20 minutes.
- In the meantime, make the filling by beating the unsalted butter and marshmallow fluff together until smooth.
- Add the confectioner's sugar and vanilla extract to the butter mixture and mix until combined and fluffy.
- Once the cake has cooled, cut out hearts using a 4-inch heart-shaped cookie cutter. You will need two hearts for each cake.
- Pipe the filling onto half of the heart-shaped cakes and place the remaining hearts on top to create a sandwich.
- Freeze the assembled cakes for 1 hour to set the filling.
- Melt the candy melts in a microwave-safe bowl with the coconut oil. Stir until smooth.
- Dip each frozen cake into the melted candy mixture, covering it completely.
- Place the dipped cakes on a baking sheet lined with parchment paper and let them set in the refrigerator for 15 minutes.
- Finally, pipe melted white chocolate into swirls on top of each cake for a beautiful finish and chill them again to let the swirls set.